This article was last updated on 24/05/2018
Throughout last week I received bulks of PM from oxwall users asking me how I customized my Oxwall site. After replying to tons of pm, I decided to make the tutorial public and available to all my readers.
Of-course, this is nothing like the customized oxwall sign-in page I created much later but I bet is just as good. It’s also important that you note that the two pages can be used without conflicts.
Customize Your Oxwall/Skadate Join Page with a Plugin
The easiest and fastest way to do this is using the Ultimate Landing Page plugin. With a few customisation from your admin area, you can produce any design for your registration and sign-in page.

The Facebook Clone plugin is also safer to use because the pages will not be affected by platform update.
Customize Your Oxwall/Skadate Join Page with Core Modification
If you know what you are doing and can keep up with making changes each time Oxwall release a platform update, here is how to do it manually.
 |
| Screen Shot of My Oxwall Site |
Follow the steps below carefully, to custom your join page.
1. Split your Join Page Questions
Skip to step 2 if you are using Skadate software. Otherwise, follow this simple steps to split your registration steps in two.
Making your profile questions two steps will enable two step registration form for your oxwall site, hence, reducing the number of questions on each page.
The first page usually contains: Real Name. Email, Username, Password, Birthday and Gender, when a user clicks on continue it takes them to another page containing other profile questions.
How to split join page question to two steps
- Login to your admin dashboard
- Go to users, click on profile questions
- Click on edit account types
- Enter any name and click add new account type
- Mouse over on the new account you have created and click edit
- Clear the name and click save
Congrats! You have completed the first step.
2. Re-size your Website Canvas
Most Oxwall themes have a canvas width of 940px but to have a perfect Facebook looking front page your canvas width has to be a lot better than that.
Be sure to skip this part if you don’t want to re-size the width of your website
How to change your website canvas width
- Login to your admin dashboard
- Click on edit theme
- Click on CSS
- Now copy the following code and paste it in your custom CSS:
.ow_canvas{
	width: 100%;
}
- Click save and you are good to go.
3. Modify Join Page Template File
This could be a bit tricky, but is totally safe. This is the place where you can customize your join page and add extra items.
- Login to your cpanel/ftp
- Locate
join_index.html in /ow_system_plugins/base/views/controllers
- At the beginning of the document, find {block_decorator name=”box” type=”empty” addClass=”ow_superwide ow_automargin”} and replace it with the code below:
{style}
.ewt_page_wrap {
    width: 100%;
    overflow: hidden;
}
.ewt_page_wrap img{
	max-width:100%;
}
.ewt_page_half {
    width: 50%;
    overflow: hidden;
}
{/style}
<div class="clearfix ewt_page_wrap ow_automargin">
{block_decorator name="box" type="empty" addClass="ewt_page_half ow_left" label='Enjoy The Freedom Of Social Network!'}
	<h4> Join Millions of people having fun and making new friends on Nairatrain.com every day.</h4>
	<img src='http://oxwall.ewtnet.us/ow_userfiles/themes/theme_image_4.png' />
{/block_decorator}
{block_decorator name="box" type="empty" addClass="ewt_page_half ow_right"}
- At the end of the document, replace {/block_decorator} with the code below:
{/block_decorator}
</div>
- Replace http://oxwall.ewtnet.us/ow_userfiles/themes/theme_image_4.png with your image.
- Save your code move to the next step.
4. Clear your Website Cache
If you are a regular Oxwall user, you would be familiar with the fact that changes made to static and template files does not reflects on the live-site if development mode is disabled. You will have to enable development mode by setting OW_DEV_MODE to true for a while and remember to set it back false when you are done.
To skip the hassle of turning OW_DEV_MODE back and forth, follow the tutorial to learn how to clear template & static cache in Oxwall with and without a plugin.
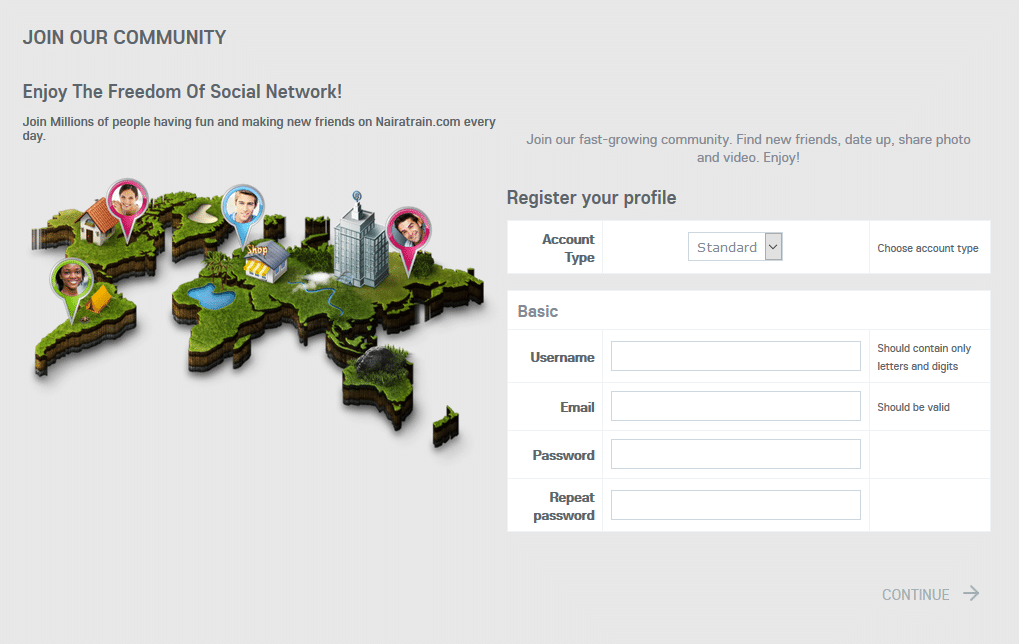 Your site should look like this.
Finally, reload your website join page and leave a comment below.
Did you get the answer you were searching for?
Save hours of searching online or wasting money testing unnecessary plugins, get in touch with me and let's discuss a suitable plan for your project. Best thing about this service is that you are never placed on hold and get to talk to an expereinced Oxwall/Skadate developer.
Get Answers for Free!
Ask a question related to this topic and get immediate answers from other community members in 48hrs or less. Contribute by answering members questions.
Ask Question
Premium Service
Whether it's a custom plugin, theme or dedicated support needed to get you started on your project, get professional 24/7 support tailored to your need.
Get in Touch
Or just leave a comment...